Great results start with great planning.
If you’re looking at covering your deck with vinyl and want it to look great and retain its integrity for years to come, preparation and planning for your installation is highly important. Here is an outline of the basic process with a few installation pointers to help.
To get started, you will need to take a few measurements so that you can create an accurate list of materials. You’ll need to know the dimensions of your surface as well as the slope, so that you can decide the best width of vinyl sheets to use and how many rolls to purchase. Take into consideration that you need to add in extra for running the vinyl up the wall and over the edges where it will be attached to flashing. The overlap of vinyl sheets is also typically 1 – 1.5 inches, so you want to account for that.
You’ll also need to consider your “runs”, the direction that your vinyl sheets will run. It’s always best to talk to one of our staff who know the right questions to ask and can provide you with options and costing for each. Typically seams run perpendicular to the house so that water will follow the slope and off the edge of the deck, however running them parallel to the house can sometimes use less materials and require less seams. This can give a more uniform look to the deck (especially a long thing deck that runs around the perimeter of the house). Our installers are very experienced at this and can help you determine which option is best for your project.
Your deck is only as good as its surface.
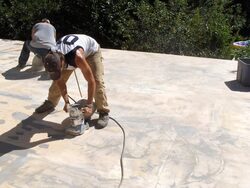
Over 50% of the total time required to install a new vinyl deck is spent prepping the surface. Your deck should be sheeted with 3/4″ or 5/8 tongue and groove plywood as it needs to be sturdy to reduce the chances of flexing and movement. Deck screws should be placed every 8-12″. Starting with a new plywood surface is preferred so that it’s as level as possible. It should have enough of a slope to direct water away from the house. You’ll also want to pull back the siding so that you can access the one-foot area of the lower exterior wall where the wall and deck surface meet. Once the plywood is in place, the larger seams where the plywood pieces join are filled with vinyl-specific compound as well as any low spots. Next the deck is sanded to ensure the surface is level and to rough up the surface for better adhesion. Project-specific drip flashing is applied to the edges with roofing nails every few inches to ensure it stays flush with the plywood surface. The vinyl will be wrapped over this flashing (2 inches below deck edge) that creates a drip edge off the deck.
Getting the big picture for placement.
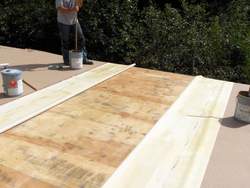
New vinyl should be wrapped up the exterior wall 3-6″ so that the siding of your house can be overlapped creating a waterproof seal. Vinyl sheets come in two widths, either 54 or 72″ wide, and these will overlap one another by 1-1.5″. If there are posts on the deck and there is no siding to overlap it, the vinyl should be wrapped up the posts and a mechanical fastener should be applied to ensure water doesn’t get between the post and the vinyl if the siding does not cover them. Lastly, the vinyl is wrapped over the deck edge flashing glued and the edge is heat-sealed. A vinyl clip is often applied to the edge where vinyl meets the bottom of the flashing to provide a clean and tidy edge.
Now that your surface is prepped, the heat is on.
Safety comes first, so make sure you have proper protection to wear including gloves and a respirator. Make sure there is adequate ventilation to deal with the fumes. Project specific vinyl glue is applied to the backs of the vinyl sheets. Additional glue is also applied to the deck surface and when the two types of glue come together the adhesion process begins.
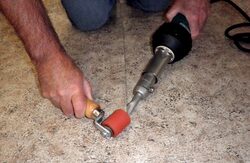
Wherever these layers of vinyl overlap, they are also heat-sealed together using a special heat gun. Duradek offers a ten-year warranty on their product when a qualified dealer has installed it. We highly recommend professional help at this point. YOU DO NOT want to try a DIY. Not only is it an acquired technique to get clean, tight, and tidy seams, but leaving the heat gun in an area too long will result in burnt vinyl, which can be extremely costly.
Once the seams have been finished, the deck is ready to be enjoyed!
We are very confident about the results that can be achieved and a job done right will last upwards of 20 years. The research and development behind Duradek vinyl decking products is impressive and continues to improve. It’s always best to consult a Modern representative during the planning stages, so we can offer our expertise in product choices, installation pointers, or inspect your current deck to ensure it has been correctly prepared for vinyl. Give us a call for a free estimate.